
First PC Build Checklist and Best Practices
So you’ve decided to build your very own personal computer? Great!!!
Deciding to do something is always the first step to success. Doing it is a completely different story, and that’s where we come in. We’ve wanted to make the journey simpler for you by providing you the tools and steps that you should take if you want to be successful at putting your own PC together.
Building your own PC is a great way to assemble a useful device while experiencing the pride and sense of personal accomplishment that comes with creating something uniquely yours. Your PC will no doubt provide you with countless hours of enjoyment and if necessary, productivity.
Let’s go over some of the essential and optional tools and materials you’ll need in order to accomplish this task:
Phillips #2 driver
Small flat driver
Small pair of cutting pliers
Bag of 5 in. cable ties
Static-free work surface (see below)
Monitor, keyboard and mouse
Up to several small containers for hardware, optional but useful.
You’ll likely get a few zip strips with your case, but not enough for all the cable management which you should do.
The tools above are for a bare minimum install and don’t take into account any of the little issues that may manifest themselves during your build.
Really, if you plan on building and therefore maintaining your system you should make a minimal investment in tools and depending on your situation a basic anti-static mat.
Rosewill offers a basic kit for $23 that includes everything you’ll need to work on a custom or OEM PC including the most basic form of anti-ESD (ElectroStatic Discharge) protection, the anti-static wrist strap. If you already have the tools you need to build your own PC, we still highly recommend you buy some form of ESD protection, wrist straps are around $5. Mats can be had for under $25, and if the limit of your requirement is to build your own PC, really a wrist strap is good, just remember to use it.

Now that you’ve assembled your tools, let’s talk about PC building in general terms so you can get an idea of the best way to go about your particular build. To that end we’ve assembled a list of best practices you can follow to help ensure your first build is easy and successful.
First, make sure your work space is clean and uncluttered. Don’t assemble your PC on carpet or any fabric surface. Work on a table at least 3-4 feet square or the equivalent in other shapes if possible
Second, prepare your case:
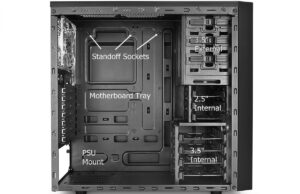
Remove both side panels.
Remove the hardware and accessory bag fom the inside and free the front panel wires.
Remove the front panel, guiding the wires if they are attached to the front panel and noting the proper access holes for reassembly.
Sort your case hardware – Standoffs, coarse screws, fine screws, etc. Note there may be two types of fine-thread screws. If so they are for the motherboard and drive mounting. Test them in the standoffs and separate your motherboard screws at least. In many cases the board and HDD screws will have different heads for easy identification.
Install your storage devices.
External 3.5″ drives and devices like card readers or fan controllers are slid in through the front of the case and fastened as specified in their or the case instructions.
Install your 2.5″ and / or 3.5″ internal drives a shown in your case manual.
Open your new motherboard and accessories and place the board on an anti-static surface, including the top of the closed box itself if necessary. Most boards come resting on a layer of anti-static (pink) foam, works great for what you need to do later on so keep it around.
Using the mounting holes for your motherboard as a guide, install motherboard standoffs in all the appropriate sockets in the motherboard tray. IMPORTANT: You must install motherboard standoffs in ONLY the locations corresponding to your motherboard’s mounting points. This is the most crucial thing you’ll do during the entire build so execute flawlessly.
//If desired, “breadboard” your system to make sure all the core components – CPU, memory and motherboard function correctly before you install them in the case.
Open the PSU and sort or install the ATX main (24-pin) and CPU (4-8 pin) cable leads.
Make sure the PSU power switch is off (side 0 depressed).
With the motherboard well-supported on an anti-static surface, install the CPU in accordance with the instructions either in the CPU or motherboard manual.
Install one DIMM in slot A1 of the motherboard
Plug a USB keyboard and mouse into the appropriate ports on the back of the motherboard.
Carefully plug in the ATX main (24-pin) and CPU 4 or 8-pin power connectors from your PSU.
Plug the PSU into a surge protector.
Turn the PSU on.
On the motherboard, locate the front panel header and the two pins dedicated to the power switch and, gently and momentarily bridge the two pins with a small flat driver tip.
Skip to the Setup section below to read about things to look for and check.//
Install the rest of your memory while the board is supported on its foam, and if desired leave the cooler in place as a handy way to grab the board at its strongest point, the reinforced area around the socket.
//If you installed a GPU to test the board, remove it at this point.//
Lay the case on its side, motherboard tray facing up.
Locate the rear I/O shield included with your motherboard and press it into place in the rectangular slot at the rear of the case. Make sure the correct side is facing out, and that you’ve matched the location of the ports on the motherboard before popping the shield into place.
Carefully supporting the motherboard, lower it into the case and gently slide it back into place so the ports on the board are correctly located and the mounting holes on the board line up with the standoffs.
Fasten the motherboard in place using the correct screws supplied with the case.
Plugging stuff in…
The rest of the build is literally either slotting devices like sound or video cards, or plugging in peripherals.
This is where it pays to take a little time and be willing to go back if necessary until you have a neat and aesthetically pleasing build.
In general terms, all modern gaming cases have ample routing ports in the frame to allow you to get your cables looking tight in short order.
All of the necessary cables can be routed through ports near the PSU and back through ports near their corresponding motherboard headers, drives or expansion cards, etc.
Finally, install or route your case fans to their motherboard headers.
Beyond that, all we can recommend is patience and forethought.
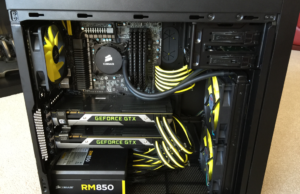
This is where a little extra time results in pride of ownership for years.
Remember, you want this…
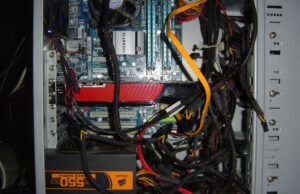
Not this…
Setup minimal suggested actions / checks:
Is the board correctly recognizing the CPU? What about memory? Correct size, speed and timing?
If not, note the discrepancy and maybe try to apply a quick XMP profile to see if it’s resolved. If not, note need to investigate later and drive on.
Are the storage devices correctly recognized and plugged into the desired ports?
Is the system correctly configured for your storage / OS?
How is the CPU and system temperature?
Remember to save any changes you make in setup.
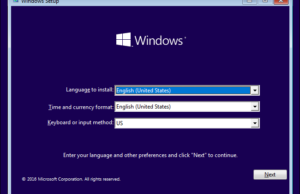
Proceed with your OS install. Then immediately install security software and your system drivers. If possible, install just the LAN driver and then go to your board’s support page for the latest updated drivers.
If planning on OC, live with the system stock for a few days to determine it’s stable under those conditions, and then proceed with caution. Remember, warranties don’t cover OC.
Final Thoughts
We have provided a comprehensive guide on how to build your own PC. Not only have we mentioned that parts you’ll need, but we have also provided you detailed steps of what you need to do.
Getting a professional technician to do this job could have cost you hundreds of dollars, but we’ve provided this information to you for free. We’d love to hear from you how this tutorial has helped you build your own PC. Also, if you have questions or queries, don’t hesitate to get in touch with us. Until next time.
Happy building!
Further reading:
Cable Management – https://blog.logicalincrements.com/2014/07/pc-cable-management-101/
You may also like...


Copyright © 2019 GPUnerd.
gpunerd.com is a participant in the Amazon Services LLC Associates Program, an affiliate advertising program designed to provide a means for sites to earn advertising fees by advertising and linking to amazon.com. Beware: it is possible that the information provided above is not currently up-to-date or guaranteed to be accurate. Pay close attention to the product description by retail shops, GPUnerd.com is not liable for incorrectly displayed products and/or prices.